Want to know how to install a sprinkler system yourself? Here’s a quick answer:
Installing your own sprinkler system might seem like a daunting task, but with the right guidance and planning, it’s entirely doable. You’ll need some time, a handful of tools, and a clear plan to make sure your lawn and garden get just the right amount of water. Imagine saving on utility costs and preventing soil erosion while keeping your landscape lush and green—all by your own hands.
My name is Scott McLeod, and with over three decades of experience in landscaping and irrigation systems, I’ve seen how a well-installed sprinkler system can transform a yard. Let’s dive into the details and get your lawn looking its best.
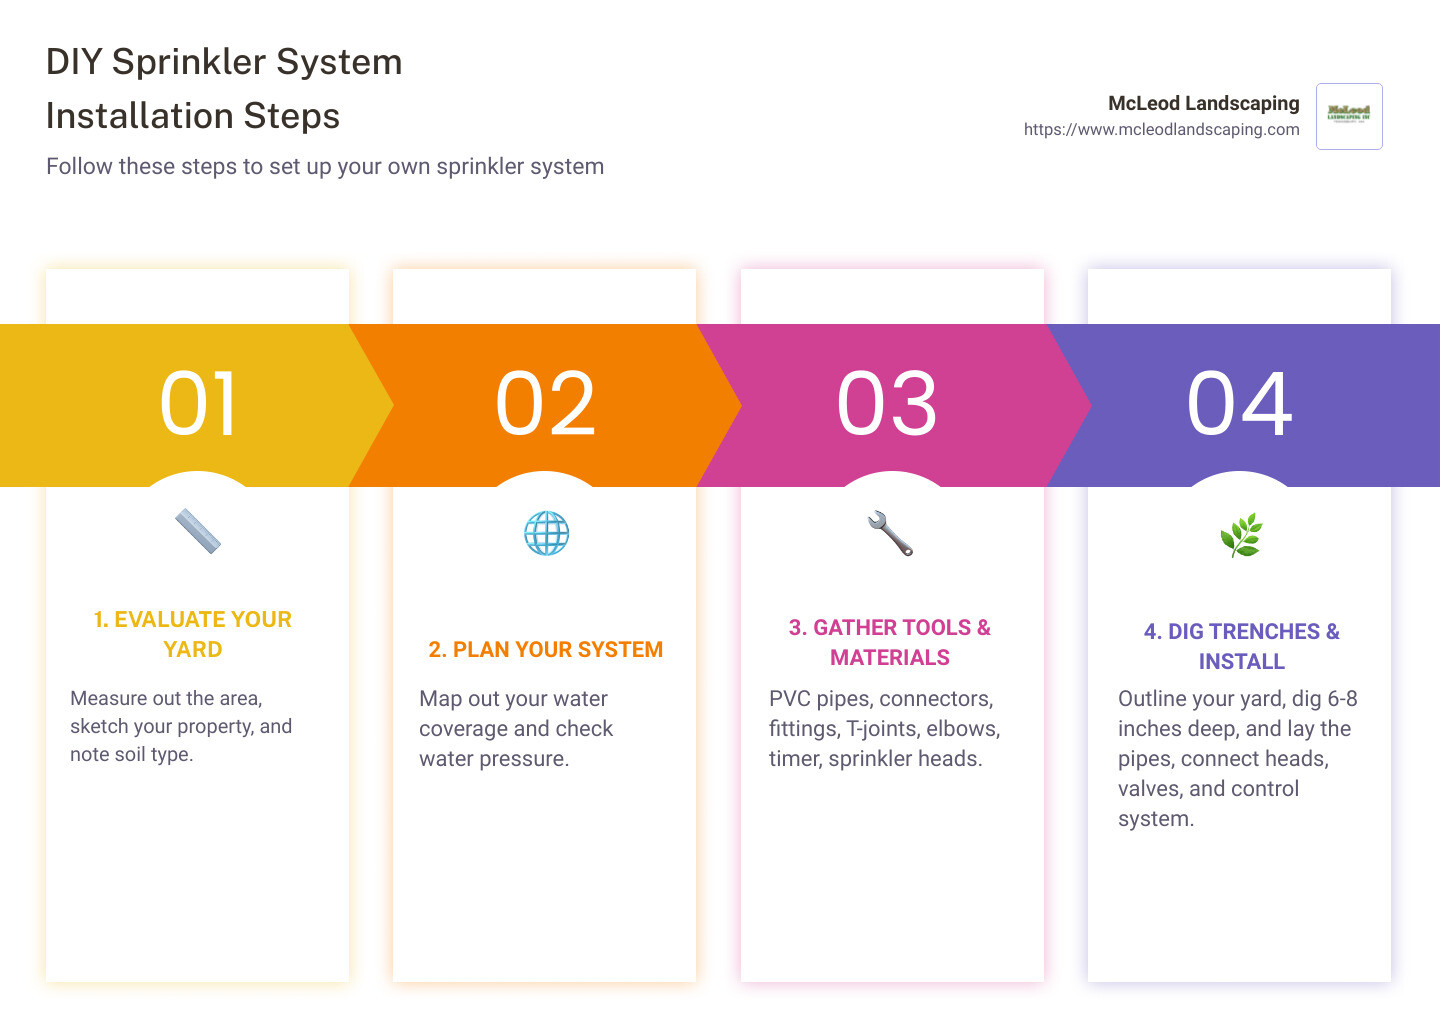
Before you start digging, it’s crucial to plan your sprinkler system carefully. A well-thought-out plan ensures efficient water use and prevents common pitfalls. Here’s what you need to consider:
First, assess your yard. Identify key features like trees, flower beds, sidewalks, and fences. Note areas with different sun exposure and slopes.
Example: If you have a shaded playground area and a sunny lawn, you’ll need to create separate watering zones to avoid overwatering or underwatering.
Water pressure is measured in pounds per square inch (PSI). You need a pressure gauge to determine your working water pressure. Attach the gauge to an outdoor faucet and ensure all other faucets are off.
Tip: Check the PSI at different times of day for accuracy. Sprinklers generally work best at 30-45 PSI. If your pressure is too high or low, it can affect the system’s efficiency.
Your soil type affects how water is absorbed. Sandy soils absorb water quickly but need more frequent watering. Clay soils absorb water slowly but retain moisture longer.
Fact: Overwatering clay soil can lead to runoff and erosion. Adjust your watering schedule based on your soil type to avoid these issues.
Check local regulations before you start. Some areas require permits for sprinkler systems, especially if you need to install a backflow prevention device. Call 811 to locate underground utilities before digging.
Important: Some states require licensed professionals for installation. Make sure you comply with local codes to avoid fines.
You also need to know your water flow rate in gallons per minute (GPM). Use your outdoor spigot to fill a container and time it. Divide the container’s volume by the time it took to fill, then multiply by 60 to get the GPM.
Example: If it takes 30 seconds to fill a 1-gallon container, your flow rate is 2 GPM.
Create a detailed map of your yard, noting all features and zones. Measure and draw your property to scale on graph paper. Mark where the water meter and manifold will be located.
Tip: Use a scale of 1 inch = 10 feet for accuracy. This will help you plan the placement of sprinkler heads and zones effectively.
By evaluating your yard, understanding your water pressure and soil type, and complying with local ordinances, you’ll set a solid foundation for a successful sprinkler system installation. Next, we’ll cover how to choose the right components for your system.
When it comes to how to install a sprinkler system, choosing the right components is crucial. The right materials and tools ensure efficiency, durability, and ease of maintenance. Let’s dive into some key components: PVC vs Polyethylene pipes, sprinkler heads, timers, and valves.
PVC (Polyvinyl Chloride) Pipes
PVC is the most common material for irrigation systems. It’s rigid, strong, and ideal for warmer climates. Connections are made using adhesive, which creates a solid bond.
Pros:
– Strong and durable
– Easy to cut with a hand saw or pipe cutter
– Ideal for areas without extreme freeze cycles
Cons:
– Can crack in freezing temperatures
– Requires more fittings for complex layouts
Polyethylene Pipes
Polyethylene, or poly pipe, is flexible and well-suited for colder climates. It can bend around obstacles and is connected using specially designed clamps.
Pros:
– Flexible and adaptable
– Suitable for freeze-thaw conditions
– Requires fewer fittings
Cons:
– Slightly less durable than PVC
– Connections can be less secure without proper clamps
Sprinkler heads are rated based on the gallons per minute (GPM) they can supply at your specific pounds per square inch (PSI). Here are some common types:
Pop-up Sprinklers:
These retract into the ground when not in use, minimizing damage from lawn equipment. Ideal for lawns.
Gear-Driven Sprinklers:
Known for quiet operation and consistent water distribution. Great for large lawns.
Impact Sprinklers:
Rotate and distribute water in a circular pattern. Commonly used in agricultural settings.
Rotary Sprinklers:
Deliver water in a rotating stream. Efficient for large lawns and gardens.
Tip: Choose heads based on your soil type and water pressure. For example, spray nozzles work best at 30 PSI, while rotors perform well at 45 PSI.
Timers allow you to automate your watering schedule. They can be set to turn the system on and off at specific times, ensuring your lawn gets the right amount of water.
Manual Timers:
Simple and cost-effective. You set the time manually.
Digital Timers:
Offer more features, such as multiple programs and weather adjustments.
Smart Timers:
These connect to your smartphone and use weather data to optimize watering schedules. They are more expensive but offer the best efficiency.
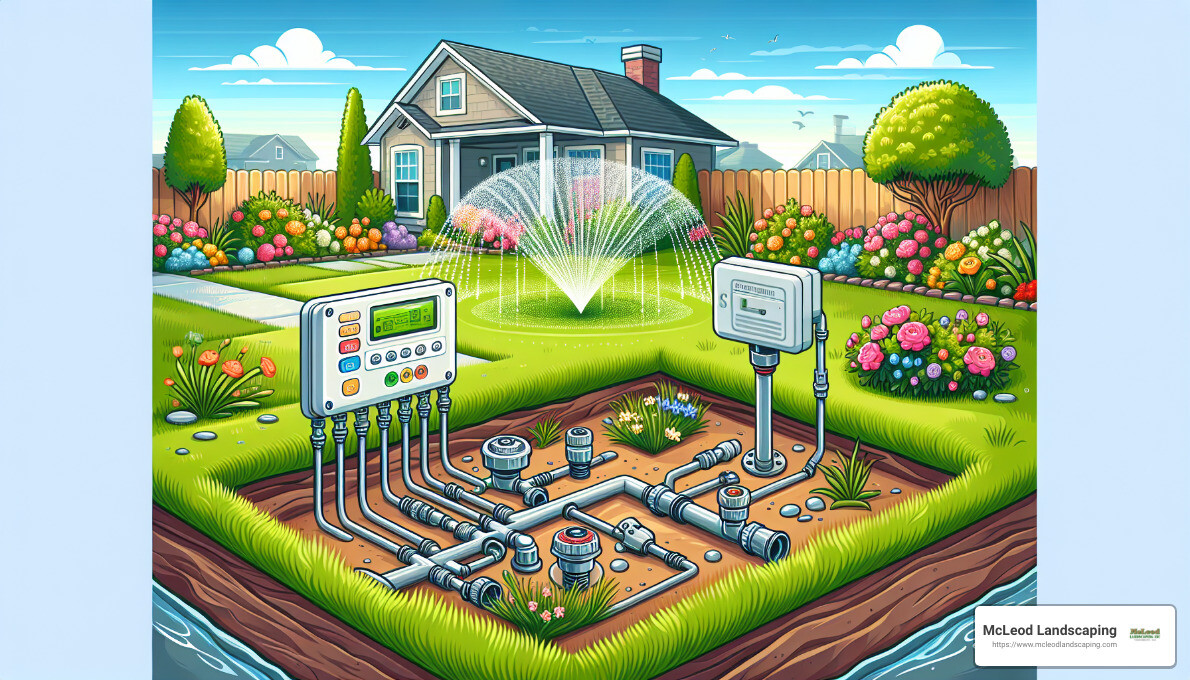
Valves control the flow of water to each zone of your sprinkler system.
Zone Valves:
These are installed at the beginning of each zone. They can be operated manually or electronically.
Master Valve:
Installed at the main water source, it controls the entire system.
Backflow Preventer:
This is a crucial component that prevents contaminated water from flowing back into your clean water supply. It’s required in most areas.
Tip: Avoid cheap valves like Orbit. Go for trusted brands like Rain Bird, Toro, or Hunter. Also, consider valves with flow control for better efficiency.
Valve boxes protect your valves while providing easy access for maintenance. Rectangular boxes can hold multiple valves, while round boxes are good for single valves or shut-offs.
Tip: Dig your valve boxes deeper and add gravel underneath. This makes future maintenance easier and prevents waterlogging.
By selecting the right components, you’ll ensure your sprinkler system runs smoothly and efficiently. Next, we’ll guide you through the actual installation process, starting with digging and preparing trenches.
First, mark the layout of your sprinkler system with stakes and string. This helps you visualize where the pipes and sprinkler heads will go.
Trench Depth: Dig trenches 6 to 12 inches deep. This depth allows the sprinklers to retract underground, protecting them from lawnmowers and foot traffic. For colder climates, deeper trenches may be necessary to prevent freezing.
Tools: Use a garden spade or a ditch spade for narrow spaces. For larger areas, consider renting a power trencher to save time and effort.
Landscape Fabric: Line the bottom of the trenches with landscape fabric. This helps prevent weeds from growing into your sprinkler system.

Backflow Prevention: Install a backflow preventer to keep your drinking water safe. This device stops contaminated water from flowing back into your home’s water supply.
Main Line Connection: Connect your sprinkler system to the main water line. You may need to consult local codes or a professional to ensure you’re using the correct fittings and connections.
PVC Assembly: For PVC pipes, apply PVC cement to both the inside of the fitting and the outside of the pipe. Insert the pipe fully and give it a 1/4 turn to distribute the cement evenly. Hold for a few seconds to ensure a secure bond.
Poly Pipe Installation: Slide a clamp over the poly pipe, insert the fitting all the way, and then tighten the clamp. Poly pipe is more flexible and is ideal for colder climates.
Head-to-Head Coverage: Place sprinkler heads to ensure they cover each other’s spray patterns. This ensures even watering and no dry spots.
Zone Valves: Install zone valves in a valve manifold. These valves control different sections of your yard, allowing you to water various areas independently.
Tip: Use swing joints or EZ Pipe to make positioning sprinklers easier. These flexible connectors allow you to adjust the height and angle of the sprinkler heads.
Timer Installation: Install the timer in a convenient location, preferably near a power source. Follow the manufacturer’s instructions for mounting and wiring.
Wiring Valves: Connect each valve to the timer using color-coded wires. Label each wire to keep track of which zone it controls. This will make future maintenance and adjustments easier.

By following these steps, you’ll have a well-laid-out sprinkler system ready for testing and adjustments. Next, we’ll cover how to test and fine-tune your system to ensure it operates efficiently.
Once your sprinkler system is installed, it’s time to test and adjust it to make sure everything works perfectly. Here’s how to do it:
Before you start testing the sprinklers, flush the entire system. This will remove any debris that might have entered the pipes during installation.
Tip: “I had to remove the sprinkler guts to flush the system zone by zone. It was a bit of work, but it ensured no debris clogged the heads,” says a DIY enthusiast from a popular lawn care forum.
After flushing, check the water coverage of each zone.
If you notice uneven watering, you’ll need to adjust your sprinkler heads and system settings.
Note: “I had to swap the nozzles on two of the 42SA’s on zone 3 because the low-angle nozzles couldn’t get across the ditch,” recalls a user from a related thread.
By thoroughly testing and adjusting your system, you’ll ensure that your lawn and garden get the right amount of water, with no dry spots or overwatering.
Next, we’ll discuss how to maintain your sprinkler system and troubleshoot common issues to keep it running smoothly.
Once your sprinkler system is installed, keeping it in top shape requires regular maintenance and troubleshooting. This will ensure your lawn stays lush and green. Here’s how to handle seasonal maintenance, winterization, and leak repair.
Regular maintenance throughout the year can prevent major issues and keep your system running efficiently.
Winterizing your sprinkler system is crucial to prevent damage from freezing temperatures.
Leaks can waste water and lead to higher bills. Here’s how to identify and fix them:
By following these maintenance and troubleshooting steps, you can ensure your sprinkler system operates smoothly year-round.
Next, we’ll answer some frequently asked questions about how to install a sprinkler system and its upkeep.
Yes, you can! Installing a sprinkler system yourself is definitely possible with the right tools and guidance. Many homeowners have successfully installed their own systems by following detailed plans and instructions. Just make sure to:
Pro Tip: Before you dig, always call 811 to mark any underground utility lines. This will prevent accidental damage and ensure your safety.
Sprinkler lines should be buried 6 to 8 inches deep. This depth is generally sufficient to protect the pipes from damage and freezing. However, there are a few considerations:
Tip: Use landscape fabric to line the trenches. This helps prevent soil from clogging the system and makes future maintenance easier.
Start with a detailed plan. Proper layout is crucial for efficient watering and avoiding dry spots. Here’s how to do it:
Pro Tip: Consider using different types of sprinkler heads for different zones. For example, use rotary nozzles for small areas and pop-up heads for larger lawns.
By following these steps, you can create an efficient and effective sprinkler system layout tailored to your yard’s unique needs.
Next, let’s wrap up with some final thoughts on DIY sprinkler system installation and the benefits of professional help from McLeod Landscaping.
Installing your own sprinkler system can be a rewarding DIY project. It allows you to tailor the system to your specific lawn and garden needs, ensuring efficient water use and healthy plants. By following the steps we’ve outlined, from evaluating your yard to setting up the control system, you can achieve a lush, green landscape that’s the envy of the neighborhood.
DIY Success Tips:
While DIY projects can be fulfilling, they can also be challenging. If you find yourself overwhelmed or unsure at any stage, don’t hesitate to seek professional help. At McLeod Landscaping, we specialize in irrigation system services and can assist you in achieving the perfect lawn.
Why Choose McLeod Landscaping?
Whether you decide to go the DIY route or prefer professional assistance, the goal is the same: a beautiful, healthy lawn that enhances your home’s curb appeal. Happy gardening!
For more information on our services, visit our Irrigation System Services page.
Contact McLeod Landscaping today at (978) 640-0957 or click here to schedule a consultation for retaining wall installation. Let our experienced team design and install a functional and visually appealing retaining wall that enhances your landscape.
1881 Main St Unit 1, Tewksbury, MA 01876